git branch / checkout
이전까지의 과정이 그냥 혼자 히스토리 남기는 정도의 기본적인 VCS 사용이었다면, 여기서부터 난이도가 올라가는 중상급기능이라고 할 수 있다.
개발 또는 작업을 하다보면, 특정한 feature를 개발해야 하는 경우가 생긴다. 그런데, 이게 간단하지 않고 꽤 오래 걸리는 작업이라면, 기존에 작동하던 코드들이 망가질 위험이 존재하기 때문에, 기존 코드를 건드리지 않고 따로 복사해서 feature개발을 완료하고 정상작동을 확인한 후에 원래 코드에 합치는게 가장 안전한 방법이다. 이럴 때 사용되는게 branch 이다.
branch의 정체는 그냥 스냅샷에 해당하는 commit에 대한 포인터다. 다른작업없이 그냥 git branch명령을 써보자.
~/g/myproject │ main>  git branch
* main
git branch는 현재 branch들을 보여준다. main branch가 표시되고, 왼쪽에 별표가 붙어 있다. 별표는 HEAD 포인터를 나타내는데, 여러개의 branch가 존재할 때 현재 사용중인 branch가 무엇인지 표시하고 있다. 아무런 추가 branch를 생성하지 않았기 때문에, 기본 branch인 main 하나만 존재하고 HEAD 또한 이를 가리키고 있다. git log –graph 로 확인해보면,
~/g/myproject │ main> git log --graph --oneline
* 650a1e6 (HEAD -> main) delete dont_needed_anymore.txt
* b502882 add file maybe dont needed anymore later
* a67ee7e add more text to readme.txt
* 046e349 add sleep function
* 0d52a66 the first commit.
가장 마지막 commit인 첫줄을 보면, (HEAD -> main) 이라고 동일한 내용을 표시하고 있다. GUI툴을 사용해 확인도 가능하다.
위 이미지는 vscode의 확장 플러그인인 Git Graph라는 git용 GUI 툴로 본 모습이다. HEAD 와 main 브랜치가 명확하게 보여 가져왔다. HEAD는 main옆에 동그라미 표시가 현재 HEAD의 위치를 표시한다.
branch를 쓰기전에 git checkout 에 대해 먼저 알아보자. git checkout은 로컬의 작업 디렉토리를 특정 commit의 스냅샷 상태로 바꿔준다. 다르게 말하면, HEAD 포인터를 특정 commit으로 이동한다는 얘기와 동일하다. 사용방법은 다음과 같다.
git checkout <commit>여기서 commit은 해쉬코드가 기본 ID이지만, 포인터로 쓰이는 브랜치나 태그등을 써도 된다. 브랜치나 태그가 사용자가 쉽게 commit 에 접근하기 위한 것이니 뭐 당연하다.
예를 들어, 바로 이전 commit인 b5028821로 작업 디렉토리를 바꿔보자.
~/g/myproject │ main> git checkout b502882
Note: switching to 'b502882'.
You are in 'detached HEAD' state. You can look around, make experimental
changes and commit them, and you can discard any commits you make in this
state without impacting any branches by switching back to a branch.
If you want to create a new branch to retain commits you create, you may
do so (now or later) by using -c with the switch command. Example:
git switch -c <new-branch-name>
Or undo this operation with:
git switch -
Turn off this advice by setting config variable advice.detachedHead to false
HEAD is now at b502882 add file maybe dont needed anymore later일단 변경 되었음을 알리는 “Note: switching to ‘b502882′”라고 표시된다. 그리고 장문의 설명이 나오는데, HEAD가 master 브랜치에서 떨어져(detached) 나왔다는 경고문과 설명이다. HEAD가 detached 되었다는건 매우 중요하다. 대부분의 작업이 브랜치(가장 최근 commit)에서 진행되기 때문이다. 작업자가 HEAD가 detached된걸 인지하지 못하고 수정작업을 한다면 낭패를 보게 될 것이다. 과거 commit으로 돌아가 이러한 수정작업을 하게되는 경우는 이 commit을 베이스로 하는 새로운 브랜치를 생성하는 경우 뿐일 것이다.
여기서 새 브랜치를 만들거나 undo를 하고 싶으면 git switch를 쓰라는 안내도 있는데 이건 뒤에 살펴보겠다. 마지막줄에도 “HEAD is now at b502882″와 해당 commit 메세지를 보여줘서 HEAD가 어디에 있는지 알려준다. 로컬 파일을 보면 삭제했던 dont_needed_anymore.txt가 존재하고 해당 commit 상태로 변경되어 있음을 알 수 있다. 이를 이용해서 과거 릴리즈 했던 버전을 다시 빌드하고 싶을 때 이를 사용할 수도 있고, 특정 commit버전에서 보고된 버그수정을 위해서 해당 commit으로 되돌아가 재현 시험및 수정을 해볼 수도 있다. 물론, 수정하는 경우는 새로운 브랜치를 따라.
변경된 상태에서 git log를 보면,
~/g/myproject │ @b5028821 > git log --graph --oneline
* b502882 (HEAD) add file maybe dont needed anymore later
* a67ee7e add more text to readme.txt
* 046e349 add sleep function
* 0d52a66 the first commit.master 브랜치의 최근 commit이 안보이고 현재 checkout된 commit부터 보여주고 있다. git log가 기본적으로 현재 HEAD의 이전만 보여주는 것인데, 이러한 부분들이 미숙한 사용자에게 혼란을 줄 수 있다. 전체를 보고 싶으면 다음과 같이 –all 옵션이 필요하다.
~/g/myproject │ @b5028821 > git log --graph --oneline --all
* 650a1e6 (main) delete dont_needed_anymore.txt
* b502882 (HEAD) add file maybe dont needed anymore later
* a67ee7e add more text to readme.txt
* 046e349 add sleep function
* 0d52a66 the first commit.일단 다시 원래대로 돌아가자. main은 항상 마지막 commit에 위치하므로 commit 해쉬코드대신 이 branch name을 이용할 수 있다.
~/g/myproject │ @b5028821 > git checkout main
Previous HEAD position was b502882 add file maybe dont needed anymore later
Switched to branch 'main'
HEAD가 있던 이전 commit과 새로 변경된 위치를 표시해준다.
checkout은 파일에만 적용도 가능하다. 원하는 파일만 이전 commit 상태로 되돌리는 것이다. 형식은 다음과 같다.
git checkout <commit> -- <filename>“–” 를 파일이름 이전에 붙여주는 이유는, 이 이후로는 옵션으로 인식하지 말라는 의미이다. 착오가 생겨 파일이름을 옵션으로 인식하는 것을 방지하기 위함이다. 파일을 checkout 하기 위해서 특정 파일에 대해서만 git log를 사용할 수도 있다. 이렇게 하면 해당 파일의 이력을 확인 가능하다.
~/g/myproject │ main > git log --oneline readme.txt
a67ee7e add more text to readme.txt
0d52a66 the first commit.참고로 -p 옵션을 쓰면 변경내용까지 확인이 가능하다.
~/g/myproject │ main> git log --oneline -p readme.txt
a67ee7e add more text to readme.txt
diff --git a/readme.txt b/readme.txt
index 224ab0e..2565aa9 100644
--- a/readme.txt
+++ b/readme.txt
@@ -1,4 +1,5 @@
this is the first file.
file name is 01.txt
I'm studying git.
+Why am I so idiot?
0d52a66 the first commit.
diff --git a/readme.txt b/readme.txt
new file mode 100644
index 0000000..224ab0e
--- /dev/null
+++ b/readme.txt
@@ -0,0 +1,4 @@
+this is the first file.
+file name is 01.txt
+I'm studying git.
+예를들어, 위의 git log를 보면, a67ee7e commit에서 readme.txt 에 파일내용을 추가했었다. 그 이전인 0d52a66 commit으로 해당파일을 되돌려보자.
~/g/myproject │ main> git checkout 0d52a66 -- readme.txtgit checkout 을 특정 파일에 하게되면, 단지 그 파일을 해당 commit시의 내용으로 변경해줄 뿐이다. 다른 변경사항은 없으므로 git log등으로 변경사항은 전혀 보이지 않는다. 파일내용만 바뀐 것이므로 git status로 확인이 가능하며 파일변경에 대한 책임은 온전히 작업자에게 있다. 주의할 점은 file을 checkout 했을 때 자동으로 staging area에도 올라간다는 점이다.
~/g/myproject │ main +1> git status
On branch main
Changes to be committed:
(use "git restore --staged <file>..." to unstage)
modified: readme.txt이는 git의 디자인과 관련된 내용인데, HEAD와 다른 모든건 staged change로 취급한다는 얘기가 있다. 자세한건 https://stackoverflow.com/questions/44163307/why-does-git-checkout-branch-file-stage-the-change 내용을 참고. 간단하게 생각하자면, commit을 checkout하는건 전체 스냅샷을 가져오기 때문에 HEAD 포인터만 옮기면 되기 때문에 문제가 없는데, 개별 파일을 checkout하면 따로 저장되는 내용이 없다. git은 이걸 cache 영역, 그러니까 staging area를 이용해 저장하는 것으로 보인다.
이제, checkout해서 변경된 내용을 새로 commit 하면 특정 파일을 과거의 내용으로 되돌리게 되는 것으로, 파일을 예전상태로 복구하는 하나의 방법이 된다.
checkout에 대해 좀 길었는데, 다시 branch로 돌아가보자. 앞에서 기본으로 우리는 main 브랜치를 사용중이라고 했다. 또한, 이것은 특정 commit을 가리키는 포인터이기도 하다. 새 브랜치를 만든다는건, 새로운 포인터를 만드는 일이다. git branch를 이용하여 새 브랜치를 만들어보자. 현재 commit에서 만드는 경우 다음과 같이 브랜치 이름만 써주면 된다.
git branch <branch name>~/g/myproject │ main> git branch new_feature
~/g/myproject │ main git log --graph --oneline
* 650a1e6 (HEAD -> main, new_feature) delete dont_needed_anymore.txt
* b502882 add file maybe dont needed anymore later
* a67ee7e add more text to readme.txt
* 046e349 add sleep function
* 0d52a66 the first commit.
new_feature라는 브랜치를 생성하고 git log로 확인했더니, HEAD -> main, new_feature 라고 모두가 하나의 commit에 표시되며, HEAD는 main을 가리키고 있다고 표시된다. new_feature라는 포인터만 생성한 것이다. 인자없이 git branch를 써보자.
~/g/myproject │ main>  git branch
* main
new_feature새로 생성한 new_feature 브랜치가 추가됐지만, main에 *표가 표시되어 HEAD가 main을 가리키고 있음을 나타낸다.
앞에서 쭉 봐왔듯이 HEAD가 가리키는 commit, 또는 branch가 현재 로컬 작업중인 내용이다. main에서 new_feature로 브랜치를 변경해보자. 앞에서 봤듯이 HEAD 포인터를 변경하는 방법은 git checkout을 사용한다. 인자로 branch 이름을 주면 된다.
~/g/myproject │ main> git checkout new_feature
Switched to branch 'new_feature'
~/g/myproject │ new_feature> git status
On branch new_feature
nothing to commit, working tree clean
~/g/myproject │ new_feature> git branch
main
* new_feature
~/g/myproject │ new_feature> git log --graph --oneline
* 650a1e6 (HEAD -> new_feature, main) delete dont_needed_anymore.txt
new_feature로 브랜치를 변경 후, status, branch, log로 확인한 결과다. status를 쓰면, “On branch new_feature”라고 현재 위치한 브랜치를 보여준다. branch 명령 또한, new_feature로 *표가 이동한 걸 볼 수 있다. log에서도 HEAD -> new_feature 로 HEAD 가 new_feature 브랜치를 가리키고 있음을 알 수 있다.
이제 이 새로운 브랜치에서 commit을 해보자. saying.py에 다음과 같이 shout() 함수를 추가했다.
def main():
hello("world")
goodbye("world")
shout("world")
...
def shout(name):
print(f"{name.upper()}!!!")
...파일을 add 하고 commit 하자.
~/g/myproject │ new_feature !1> git add .
~/g/myproject │ new_feature +1> git commit -m "add shout() to saying.py"
[new_feature 5737e57] add shout() to saying.py
1 file changed, 4 insertions(+)
현재 상황을 확인하기 위해 git log로 확인해도 되지만, 시각적으로 보기편한 GUI툴을 사용해 보겠다. 다음은 Git Cola에 포함된 DAG 툴로 본 것이다.
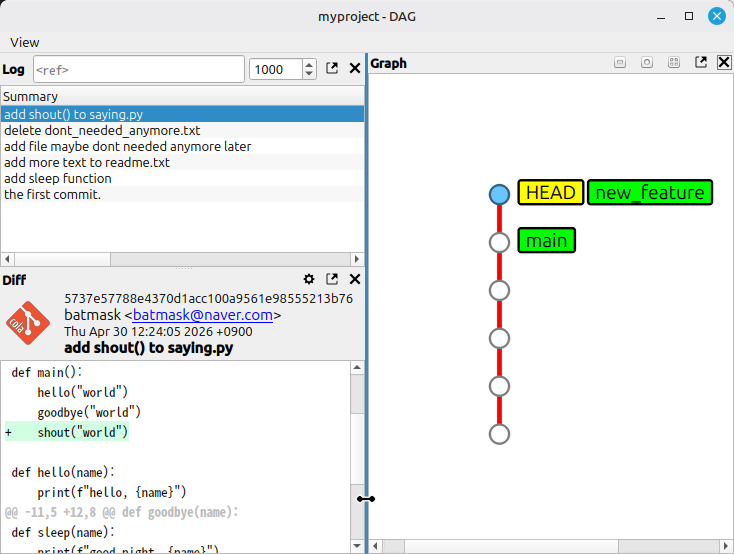
오른쪽 그래프를 보면, main을 base로 해서 생성된 commit을 HEAD와 new_feature가 가리키고 있는 것을 알 수 있다. 이상태에서 main 브랜치로 돌아가 새로운 commit을 해보자. checkout으로 main브랜치로 변경하여 새 commit을 만든다.
~/g/myproject │ new_feature> git checkout main
Switched to branch 'main'
checkout을 이용해 main 브랜치로 변경했다. 새로운 commit을 위해 saying.py에 다음 함수를 추가했다.
...
def call(name):
print(f"Hey! {name}")
...해당 파일을 add 후 commit.
~/g/myproject │ main !1> git add .
~/g/myproject │ main +1 git commit -m "add call() to saying.py"
[main d19622e] add call() to saying.py
1 file changed, 3 insertions(+)
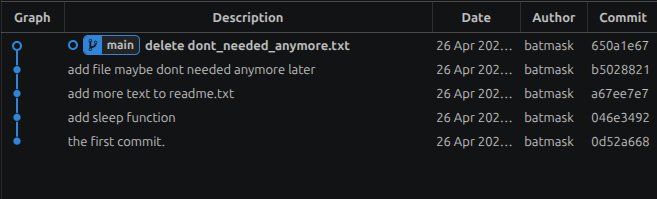
이제 다시 git log를 살펴보자. 역시나 보기 편하게 GUI로 보겠다. 이번엔 vs code 의 extension으로 있는 Git Graph를 사용했다.
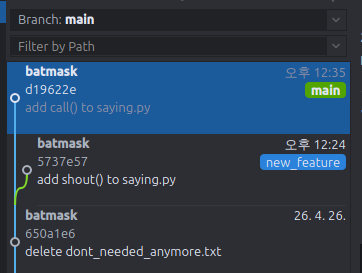
그래프의 직선라인으로 가장 최신의 commit을 가리키는 main이 뻣어 나왔고, 바로 이전 commit에서 new_feature 브랜치가 말 그대로 가지처럼 뻣어나가 있는 것을 볼 수 있다.(branch라는 이름을 쓰는 이유겠지) 이제, main과 new_feature 브랜치는 각각 각자의 길을 가게 되는 것으로, 각 브랜치에서 작업하는 내용은 차후에 merge를 하기 전까진 만나지 않는다.
지금까지 branch 명령으로 브랜치를 만들고 checkout으로 해당 브랜치로 switcing 하는걸 배웠다. 보통 브랜치 생성은 추가 작업을 위한 것이므로, 한 방에 branch생성과 변경을 할 수 있다면 편리하다. git checkout에 ‘-b’옵션을 이용하면 가능하다.
git branch -b <branch name>git restore/ switch
앞에서 쭉 봐왔다면, checkout이 좀 혼란스러울 수 있다. “HEAD를 원하는 commit 또는 branch로 옮기는 명령어”라고 이해하면 좋겠는데, 파일들도 checkout이 된다. 실제로 많이 혼란스러웠는지, 이 두가지를 별도 기능으로 구분해서 새로운 명령어가 나왔다. 브랜치를 옮겨다니는건 git switch, 파일을 되돌리는건 git restore 명령어가 바로 그것이다. 이 명령어들의 기능은 checkout을 사용하는 것과 동일하지만, 직관적이고 혼란스럽지 않다.
git restore의 사용법은 다음과 같다.
git restore --source <commit> <file>작업을 하다가 복잡해지고 꼬여서 원래 파일로 복구하고 싶은 경우를 생각해보자. 시험삼아 readme.txt파일을 수정했다.
~/g/myproject │ main !1> git status
On branch main
Changes not staged for commit:
(use "git add <file>..." to update what will be committed)
(use "git restore <file>..." to discard changes in working directory)
modified: readme.txt
no changes added to commit (use "git add" and/or "git commit -a")
git status로 보면 staged되진 않았지만 modefied로 표시되는게 보인다. 다음의 명령어로 로컬 작업내용을 손쉽게 없애버릴 수 있다.
~/g/myproject │ main !1> git restore readme.txt
~/g/myproject │ main> git status
On branch main
nothing to commit, working tree cleancommit을 명시하지 않았는데, 이런경우 현재 HEAD위치의 commit을 사용한다.
저 앞에서 이미 staged file을 취소하면서 restore를 만났었다. readme.txt에 다음의 텍스트를 추가하고 stage에 추가해보자.
...
Let's dance on sage!~/g/myproject │ main !1> git add readme.txt
~/g/myproject │ main +1>  git status
On branch main
Changes to be committed:
  (use "git restore --staged <file>..." to unstage)
	modified:   readme.txt
이걸 되돌리는 경우는 앞에서 봤듯이 ‘–staged’ 옵션을 사용하는 것이다.
git restore --staged readme.txt
~/g/myproject │ main !1>  git status
On branch main
Changes not staged for commit:
  (use "git add <file>..." to update what will be committed)
  (use "git restore <file>..." to discard changes in working directory)
	modified:   readme.txt

no changes added to commit (use "git add" and/or "git commit -a")restore는 이정도로 알아보고 switch를 알아보자. switch 사용법은 간단하다.
git switch <branch name>아까 생성했던 new_feature 브랜치로 변경해보자.
~/g/myproject │ main !1>  git switch new_feature
M	readme.txt
Switched to branch 'new_feature'

~/g/myproject │ new_feature !1>  git branch
  main
* new_feature
간단하게 변경되는걸 확인 할 수 있다. switch에도 ‘git -b checkout’ 과 동일하게 브랜치를 생성과 동시에 해당 브랜치로 변경하는걸 한번에 가능한 옵션이 있다. 바로 ‘-c’ 옵션으로 create를 의미한다. 일단, 다시 main 브랜치로 돌아간 후 testing 브랜치를 이 switch 명령어로 생성해보자.
git switch -c <branch name>~/g/myproject │ main !1> git switch -c testing
Switched to a new branch 'testing'
~/g/myproject │ testing !1> git branch
main
new_feature
* testing
새로운 testing 브랜치가 생성되고 HEAD가 해당 브랜치로 이동한 것을 확인 할 수 있다.
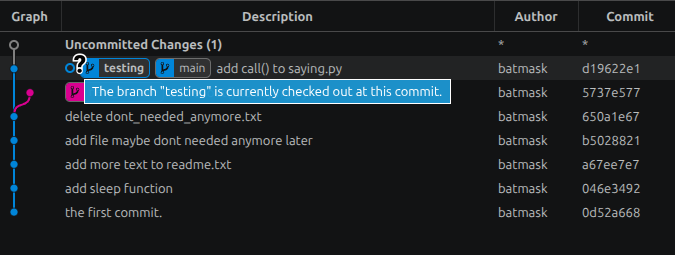
vscode 의 Git Graph로 보면 위와 같은데, 같은 commit에 겹쳐있어 확인이 바로 안되지만, HEAD 표시의 물음표에서 드는 툴팁을 읽어보면 현재 “testing” 브랜치가 checked out되어 있다고 나온다.
git tag
git은 commit에 이름표를 붙여놓을 수 있다. 이를 tag라고 한다. branch도 비슷하게 생각할 수 있는데, branch는 commit이 진행됨에 따라 같이 나아가며 새로운 commit을 가르키지만, tag는 하나의 commit에 붙여놓으면 그것으로 끝, 변하지 않는다. 어쨌든, git tag 는 기본적으로 branch와 유사하지만 위치변경이 안되는 포인터로 생각하면 된다.
git tag에는 lightweight tag와 annotated tag 두가지가 있다. lightweight tag는 단순하게 commit에 이름표를 붙이는걸 말한다. 앞에서 생성했던 testing 브랜치에 tag를 달아보자. 사용방법은 다음과 같다.
git tag "tagname" <commit>~/g/myproject │ main> git tag v0.1test testing
~/g/myproject │ main> git tag
v0.1test위와같이 별다른 옵션이 없으면 lightweight tag가 붙는다.
annotated tag를 쓰는 방법은 여기에 ‘-a’ 옵션을 붙여주는 것이다. 그리고 -m 옵션은 한줄 메세지를 작성하는데 사용될 수 있다. 위 git graph에서 new_feature 브랜치를 분기하기전, base commit에 annotated tag를 붙여보자.
~/g/myproject │ main>  git tag -a v0.1release 650a1e67 -m "fake release tag"

~/g/myproject │ main>  git tag
v0.1release
v0.1testgit tag를 보는 명령어는 인자없이 git tag를 쓰면 된다. 위에서 새로 생성한 tag가 보이는걸 확인할 수 있다. 해당 tag에 대한 정보를 보고 싶으면 git show를 사용한다.
~/g/myproject │ main>  git show v0.1test
commit d19622e19247d07e21555d3803eba76d32c4e9ad (tag: v0.1test, testing)
Author: batmask <batmask@naver.com>
Date:   Thu Apr 30 12:35:10 2026 +0900

    add call() to saying.py

diff --git a/sayings.py b/sayings.py
...
==========================================================
~/g/myproject │ main>  git show v0.1release
tag v0.1release
Tagger: batmask <batmask@naver.com>
Date:   Sun May 3 18:35:32 2026 +0900

fake release tag

commit 650a1e6795908d4a4c20412fbe2a091bd3a45d28 (tag: v0.1release)
Author: batmask <batmask@naver.com>
Date:   Sun Apr 26 16:32:05 2026 +0900

    delete dont_needed_anymore.txt
...
위의 git show결과를 보면, lightweight tag와 annotated tag의 차이가 명확히 보인다. lightweight는 tag이름외에 아무런 정보가 없지만, annotated는 Tagger, Date, tag message등 tag 자체에 각종 정보가 붙는다.
tag 의 삭제는 ‘-d’ 옵션을 쓴다.
git tag -d v0.1test특정 tag로 작업 디렉토리를 변경하려면 checkout 에 tag를 사용하면 된다.
git checkout v0.1testtag에는 switch를 사용할 수 없다. 하지만, –detach 옵션을 쓰면 가능하다. …tag의 경우는 그냥 checkout 쓰는게 젤 편하고 컨셉에 맞는거 같다.
tag의 사용 목적은 보통 릴리즈 버전을 표시하기 위함이다. github을 쓰는 경우, github자체에서 이 tag와 연동하여 release note 및 파일 다운로드까지 지원하고 있다.
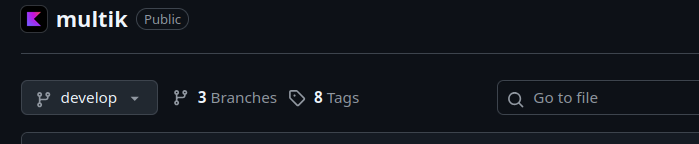
github 에 tags들이 표시된다.

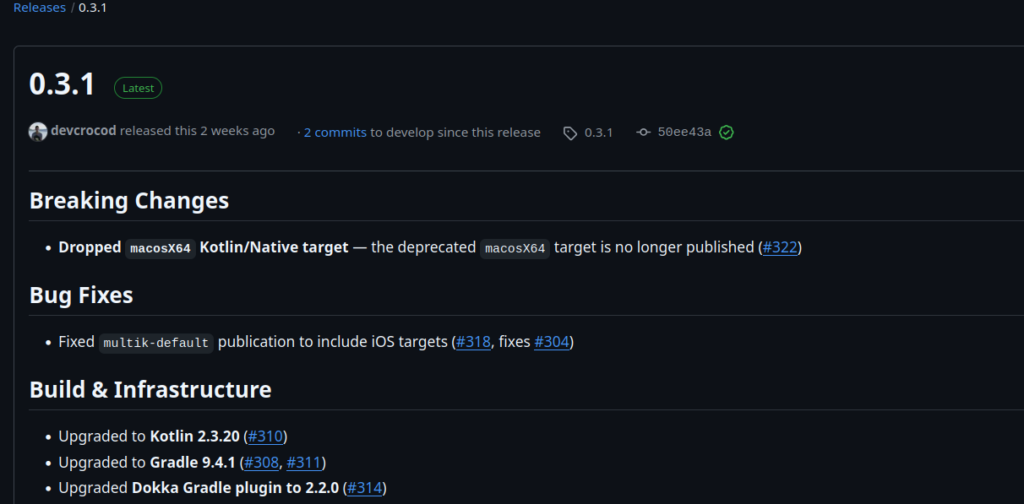
하나를 클릭해 들어가면, 각종 정보와 release note, 이슈에대해 처리된건 이슈번호가 붙어있다.
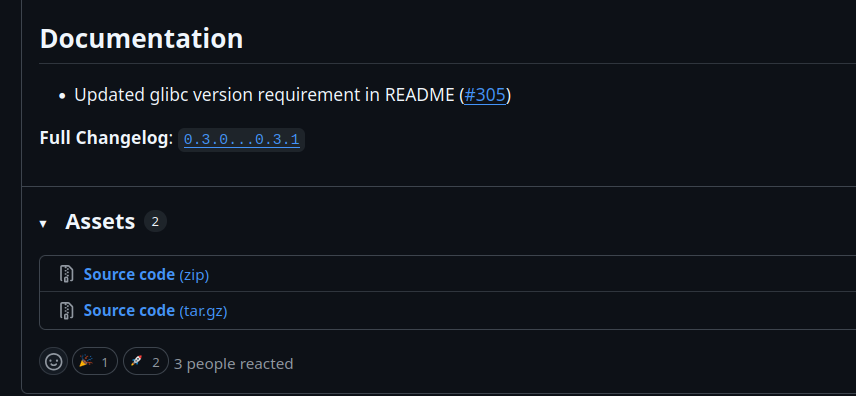
마지막부분을 보면 관련된 파일도 첨부가 가능하다는걸 알 수 있다.